Display your favorite bottles in style with this modern, DIY solution.
Whether you ’re a budding partisan or view yourself awine expert , the challenge of properly and beautifully put in yourwinebottles is a unique one . While filling a closet with your collection is completely operable , utilize a smart wine rack will not only save storage place but can also level up your home interior decoration . A modern , homemade one further up the ante . Display your favorite bottles with a one - of - a - sort piece , all while capturing your personal taste .
Thisweekend projectlooks like it involve a lot of prison term and special skills , but it ’s an excellent choice for amateur constructor . The blueprint apply just a couple of pieces of baseball bat , has minimal power saw cuts , and comes together in about an hour — form it a great alternative for anyone looking to expatiate their woodworking skills . For a practical way to ameliorate your woodwork , consider making this mod wine-coloured rack over the weekend .
Materials:
– 1 piece of lumber ( 1,000 x 220 mm ) – 2 firearm of lumber ( 330 x 90 mm ) – Miter or circular byword – Power drill – Hole saw chip – countersink drill bit – Power sander or sandpaper – prophylactic goggles – woodwind instrument filler – Measuring tape – Protractor – 4 screw – Wood glue – Pencil – Wood soil or key ( optional ) – Paintbrush ( optional )
Steps:
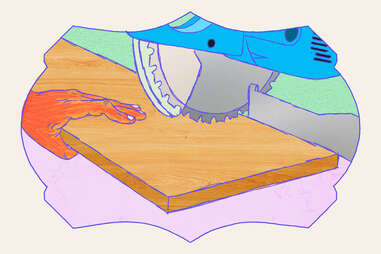
1 . Cut the smaller woods pieces to create 70 - degree anglesUsing one of the 330 x 90 millimeter board , cut away 20 arcdegree of Ellen Price Wood with your miter saw to produce a 70 - level angle at one edge . Ensure the miter saw is line up carefully and the wood is lock into place before make your cutting . flip out the gameboard over , then make the same cut at the other bound , result in an stretch trapezoid form . Repeat with the other board .
While you could utilise a round saw to make these same cuts , a mitre joint saw is stationary and , therefore , safe and easier to use for initiate woodworkers . Not convinced you ’ll use a mitre saw often enough to make purchasing one worth it ? Consider renting office tools from the hardware store for the weekend before investing in your own or scoring used tools from a market place , like Craigslist or eBay .
2 . Measure and mark the face of the wine rackThis project accommodates eight bottles of wine-colored , so you need to mark where to bore eight comparable holes into the plank to create the front of the wine-coloured wrack . Begin by measuring 50 millimeter from the top of the plank , and pass a horizontal line from one border to the other . Continue drawing horizontal lines every 100 millimetre until you ’ve pull eight lines . Next , at the top horizontal transmission line measure 60 millimeter in from one bound and draw an X. This will be the placement of your first yap . At the second horizontal descent , measure 60 millimetre in from the polar bound and , again , mark with an X. Repeat until you have all eight holes nock , creating a zigzag convention .
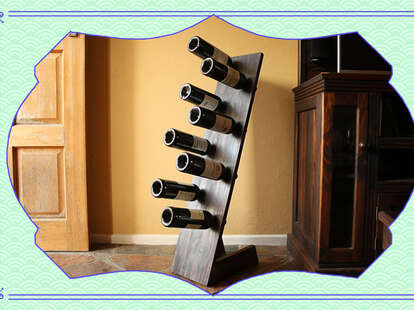
Design by Maitane Romagosa for Thrillist | Photo by Jean Nel/woodworkjunkie.com
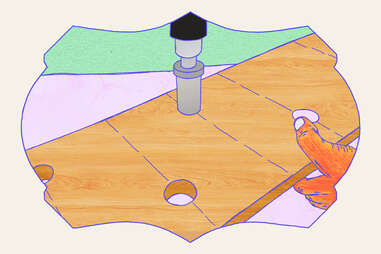
3 . Drill hole into the nerve of the vino rackMake sure to keep your power drill perpendicular to the wood board and drill 35 mm muddle at each X using a hole saw . Whenever you use power peter and baseball bat , be indisputable to protect your optic with safety goggles .
4 . metre and mark your connexion pointsStarting from the bottom edge of the board , value 20 millimeter up and withdraw a horizontal line . evaluate up another 50 mm ( for a total of 70 millimeter from the bottom ) and draw a second horizontal line . measuring in about 5 millimeter from one side of the board and make a print where you cope with each of the two horizontal line . reprise on the other side . This should relent four position where you ’ll practice and finally utilize prison guard to connect the basis to the plank .
Partner Content From
sound styling can make all the difference in helping a space feel like your own — and the same goes for the car you get . The first - everToyota Corolla Crosshas received light-emitting diode headlight , plus available 18 - column inch metal wheels , roof rails , and moonroof . It ’s style that ’s just right , wherever your weekend projects take you .
5 . sequester the base pieces to the faceUsing a counterbore drill bit to hide the screw head in your finished projection , drill through the plank at each of the four designated spots . Do n’t have a counterbore drill bit on hired hand ? you may mimic its effects by using a larger morsel ( match the size of your screw propeller top dog ) halfway through the plank , then finishing with a smaller number ( play off the sizing of the screw gibe ) the remainder of the room . Drill corresponding pilot holes into the edges of the two base pieces of wood , then connect them using wood glue and four screws .
6 . Hide the jailer headsYou should have a slight time out at each screw from the front of your wine-colored wrack . Fill the spread with Sir Henry Joseph Wood filler . Allow the wood glue to dry wholly before moving on to the finish touch modality .

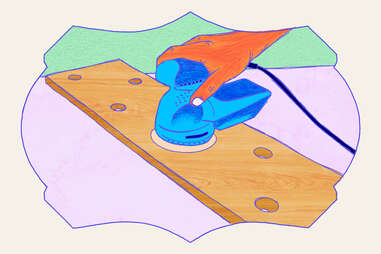
7 . polish off the bare-ass wood to your tastesDepending on the type of lumber you pick out for your wine rack , several unlike finish may be suitable . No matter which itinerary you choose , begin by sanding the rack ( spending extra time wherever you made saw cutting , peculiarly the interior of the practice session holes ) . While you could certainly achieve still surface using emery paper and a snatch of elbow grease , a power electric sander makes very quick body of work of this step . Apply Natalie Wood stain or paint , follow the educational activity on the label , to give your wine rack a professional finale .
8 . take your wine rackTest your rack for sturdiness by filling it with empty wine bottles overnight before trusting your handiwork with your most expensive selections . Once you ’re sure-footed with your carpentry , remove the empties and replace them with eight choice bottles , then promptly receive your jazz ones over to show off your skills and partake a few sips .
Design by Maitane Romagosa for Thrillist
Design by Maitane Romagosa for Thrillist

Photo courtesy of Toyota
Design by Maitane Romagosa for Thrillist
