It’s the perfect accessory for getting your hands dirty in the kitchen, shop, or studio.
long-lasting , authoritative , and quintessentially American , blue jeans are an essential item you ’ll find in most wardrobes . While the silhouettes have change over time ( conceive Melville Bell - rump , skinnies , and high - waisted , just to name a few ) and the colour du jour have certainly wide-ranging ( dark rinse , stonewashed , and dead faded have all had their bloom ) , one thing has remained comparatively constant since the recent 1800s in America : Jeans were ordinarily made from denim . A rugged fabric only made stronger with hardware like rivets , a well - constructed pair of jeans can last tenner — a true marriage of fashion and social function .
While a classic couple of jean rarely conk out out of way , trendier cuts might have a more limited ledge life . Sure , you could always donate less flattering pieces to your favourite secondhand stock , but conceive keep a few stock pairs on hand for your next DIY weekend labor . In this shell , a pair of well - do it jeans gets advance into a sturdy proscenium — perfect for getting your hand foul in the kitchen , shop , or studio .
Materials:
– A pair of well - worn jean ( or new , if you prefer ) – Scissors – Tissue newspaper – Chalk – stitching acerate leaf – Thread – Seam ripper – Measuring tape measure or ruler – stitching machine ( optional ) – Iron or steamer – Apron ( to make the pattern )
Steps:
1 . Source your denimWhether you raid your own closet or source jeans from a local thrift shop class , plunk a wash that looks pleasantly faded and a denim that ’s broken - in enough to be pliable . This task is specially great for denim with a zipper beyond repair or for jeans that have worn completely through in some spots . Pay close attending to details like stitching , hemlines , and release closure , as these can all impact the final look of your DIY apron .
2 . Prep the jeansWash the jeans harmonize to the instructions on the tag , and place flat to dry out to avoid any shrinkage . Before disassembling the denim , exit a hot iron or long-neck clam over them — crop with novel - pressed fabric makes cutting , seam rip , and stitching so much smoother .
3 . Design the forestage patternTo create a sewing pattern , grab an apron that fit you well and close it in half lengthwise . Next , fold a bit of plain tissue newspaper publisher in half . Ignoring the ties at the cervix and waistline , trace the apron onto the tissue report , making sure to align the folded edge . Set the proscenium away , then cut along your describe air cautiously . Unfold the tissue paper to reveal your apron body ’s pattern .

Photo by Xin Shen / EyeEm | Graphic design by Maitane Romagosa for Thrillist
4 . Cut the denimRefold the tissue paper at its crease , and point it along the edge of one of the pant legs , again match the folded edge . Move the bottom of the apron pattern to the ahem of the trouser leg ( you ’ll employ the jean ramification possible action as a ruined edge for your apron , do away with some of your future hem work ) . Using a piece of swooning - emblazon trash , trace the pattern onto the jean gently . cutting off along your traced line , and blossom forth the dungaree to uncover the body of the forestage .
5 . Repurpose the denim pocketsTaking forethought not to damage the framework , use the furrow ripper to remove the back patch pockets from the pants . Place the pockets on the front of the apron around where the hands would naturally fall , and stick to give them in place . Make certain your pockets are center with a ruler or measuring tape before sewing them on .
6 . confiscate the pocketsThread a needle with a durable thread that matches the color of the stitching on the jeans , and bond the pockets to the proscenium with a childlike backstitch or a more ornamental whipstitching . Be certain to knot the ribbon at the interior of the apron to obliterate the finish .

7 . Stitch the proscenium hemTo prevent the non - bottom bound of your forestage from fraying , press or pin a double - fold ahem into place . Stitch along the fold line , again using yarn that matches the rest of the garment ’s sewing . While you could hand - stitch the hem , a sewing machine will make warm work of an otherwise ho-hum job .
Partner Content From
effective styling can make all the difference in help a space feel like your own — and the same goes for the car you motor . The first - everToyota Corolla Crosshas stock LED headlights , plus available 18 - in admixture wheels , roof rails , and moonroof . It ’s style that ’s just right , wherever your weekend projects take you .
8 . Measure the waistline tiesRemove the sash of the jeans with a precipitous couple of scissors hold , cutting just below the second seam . slew the waistcloth in one-half ( now opposite the clit blockage ) , then immobilise the raw edge to the body of the forestage to make the waistline sleeper . Try the proscenium on and button the waistband to insure the fit is right . To adjust the sizing of the waist tie , clip length from the raw border , then repin to the forestage .
9 . Attach your shank tiesEither by script - stitching or using your machine , attach the waist ties to the torso of the apron . These seams will see the most strain , so go over your stitches two or three time to increase the apron ’s length of service .
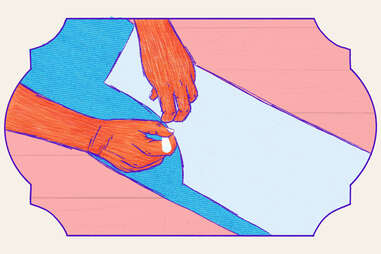
Illustration by Maitane Romagosa for Thrillist
10 . Create the neck tiesSelect another finished border from the pair of jeans ( an national leg seam is normally a good option ) , and trim it cleanly from the relaxation of the jeans . Snip the duration in half , then impound either end to the neck of your proscenium with a few stitch each . Because you ’ll tie this strand around the wearer ’s neck , it ’s good to leave plenty of additional length to allow elbow room to maneuver the tie-in .
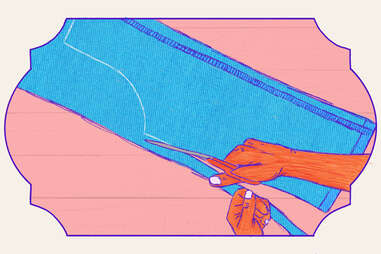
Illustration by Maitane Romagosa for Thrillist
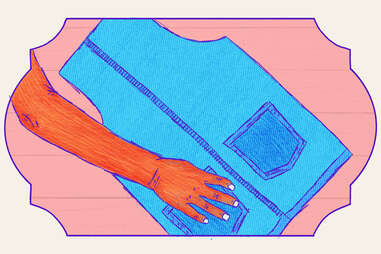
Illustration by Maitane Romagosa for Thrillist

Photo courtesy of Toyota
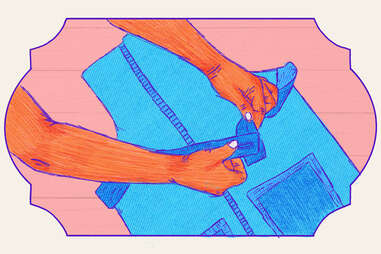
Illustration by Maitane Romagosa for Thrillist
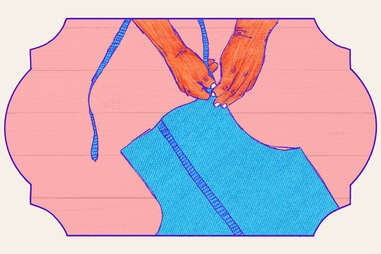
Illustration by Maitane Romagosa for Thrillist
